Documentation
EC Autopilot
Documentation is built within the platform for each module. See examples below.
NC: Session Builder User's Guide

Overview
The purpose of this document is to describe the process of quickly provisioning Netcrypt Sessions within an Explorer Controller using the Netcrypt Session Builder utility bundled with the EC Autopilot framework. It's important to note that the Netcrypt Session Builder may also be executed via command-line, but doing so eliminates certain features such as history tracking. For more information about command-line usage, please visit the documentation section of the Software Portal.
Usage
The Netcrypt Session Builder utility is designed to be executed via the EC Autopilot interface. Optionally, you may execute the ncSessionBuilder utility from the command-line, but will not receive all the benefits as found when using the EC Autopilot.
System Requirements
- Explorer Controller
- Netcrypt Devices already configured within the Explorer Controller and are online
- Modern Web Browser (Do not use legacy
with the EC Autopilot platform)
Maintenance Window Requirements
Provisioning Netcrypt Sessions is a very fast process and will only take a couple minutes. Additional steps required to provision may take a little longer, such as stopping/starting processes, etc.
- The EC Autopilot allows you to upload and validate your template spreadsheet at any time (e.g. while processes are online)
- The EC Autopilot will not allow you to continue provisioning the sessions until the EC processes have been stopped (see below)
- Because the Netcrypt Session Builder automatically creates Netcrypt sessions directly within the database, it's highly recommended to disable all other database transactions during this process. This includes, but not limited to, database backups, cron-scheduled services/scripts, etc.
- Perform a database backup using standard documented procedures. Omitting this step will limit your rollback options.
Design Requirements
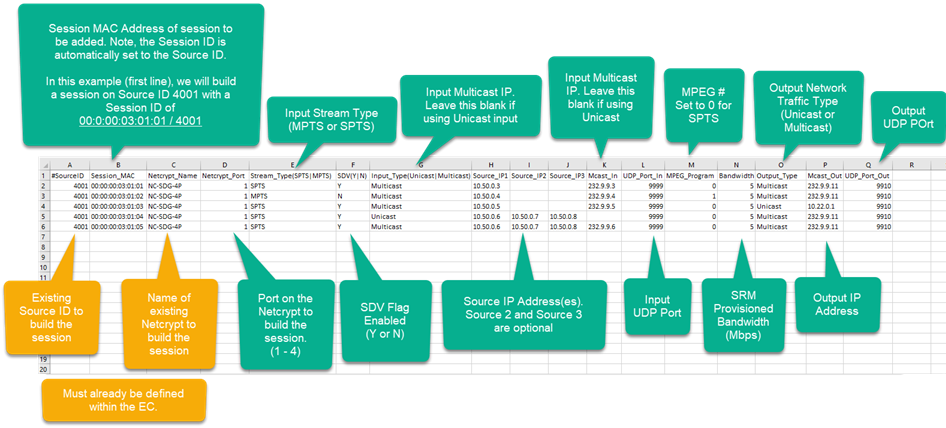
Prior to provisioning any sessions within the Explorer Controller, a design package must be created within the Netcrypt Template spreadsheet, which may be downloaded here.
- Source ID: A valid, pre-existing Source ID on the Explorer Controller.
- Session MAC: The session MAC is a 17 character colon delimited value. The values of each portion of the MAC must fall between the range of values 00 – FF. Session MAC and Source ID combination may NOT be duplicated with the Explorer Controller.
- Netcrypt Name: A valid, pre-existing Netcrypt on the Explorer Controller.
- Netcrypt Port: A numerical value in the range of 1 – 4. The assigned port must be configured on the desired Netcrypt. Acceptable values: 1, 2, 3, or 4
- Stream Type: The desired stream type for the session. Acceptable values: SPTS or MPTS
- SDV: Indicates whether the session will be an SDV session. Acceptable values: Y or N
- Input Type: Indicates the type of input MPEG stream for the session. Acceptable values: Multicast or Unicast
- Source IP 1 (Required): The primary Source IP for the input MPEG stream for the session.
- Source IP 2 (Optional): The secondary Source IP for the input MPEG stream for the session.
- Source IP 3 (Optional): The tertiary Source IP for the input MPEG stream for the session.
- Mcast In: The Multicast IP address for the input MPEG stream.
- UDP Port In: The UDP port assigned to the input MPEG stream.
- MPEG Program: The MPEG Program Number from the input MPEG stream. This value will also be used as the output MPEG Program Number. When the session is defined as SPTS, this value MUST be 0.
- Bandwidth: The SRM bandwidth assigned to the session. Acceptable range: 0.01 or 18
- Output Type: Indicates the type of output MPEG stream for the session. Acceptable values: Multicast or Unicast
- Mcast Out: The Multicast IP address for the output MPEG stream.
- UDP Port Out: The UDP port assigned to the output MPEG stream.This section describes the various elements of the Netcrypt Session Builder Template.
The image below depicts an example Design Template.
Dry Run
It's important to perform a Dry Run of your template file before making any changes. The Dry Run process verifies the design file (data errors, compatibility with database, etc) and it does not make any changes to the system. Follow the steps below to perform a dry-run with your spreadsheet.
There are two methods to execute a dry run: 1.) Select Local File, or 2.) Upload Spreadsheet.
The Local File method requires you to first upload your Excel Spreadsheet into the uploads directory using a separate mechanism (e.g. SCP, FTP, CyberArk, etc). Once uploaded, the EC Autopilot will evaluate the directory for valid Excel Spreadsheets to use. Please note, these files must not contain special characters or spaces and end with '.xlsx'. Also, it is recommended to remove these files from the uploads directory after the maintenance is complete.
The Upload Spreadsheet method allows you to upload a spreadsheet file directly from your local computer.
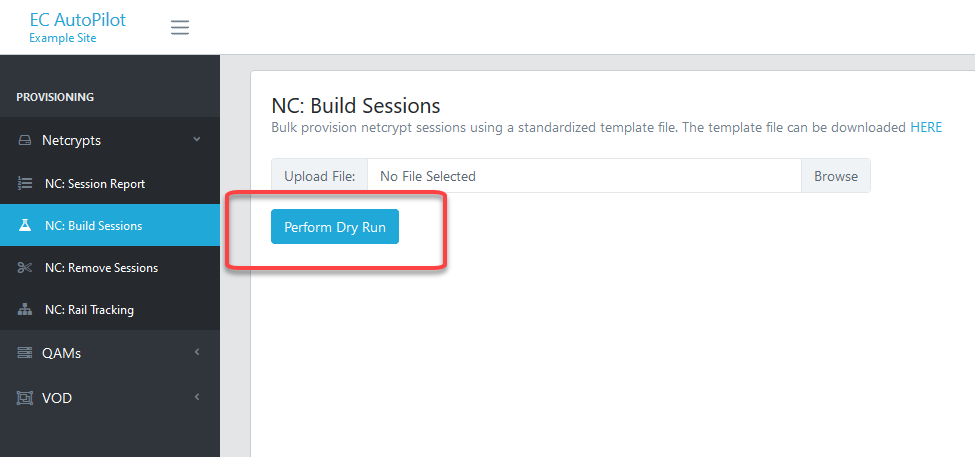
The example below depicts the Upload Spreadsheet method
- Select the Netcrypt Session Builder from the EC Autopilot menu
- Using the File Upload form, choose your completed template
- Click the Perform Dry Run button
Review Dry Run Results
If the Dry Run is successful, the interface provides a Dry Run Successful message and indicates how many sessions it would have built.
If the Dry Run failed, it provides a list of errors that it found with the design file. These conditions must be resolved prior to continuing.
Example Failure:
Build Sessions
Since the Netcrypt Session Builder directly populates configuration data, it's important that the Explorer Controller processes are offline first. This minimizes database conflicts as well as forces the Explorer Controller processes re-read the configuration data upon process restart.
Once the Dry Run has successfully passed, the EC Autopilot automatically evaluates and monitors the process status of the Explorer Controller:

The processes will likely be online at this time. The EC Autopilot prevents you from continuing and displays following message:

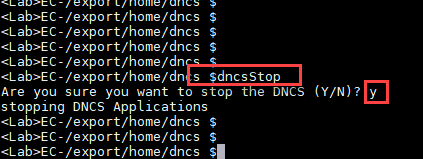
Stop the Explorer Controller processes by executing dncsStop as the dncs role/account. Refer to any applicable internal operating practices for additional information.

Once the processes have stopped, the EC Autopilot will display an option to build the sessions. Click the Build Sessions button to immediately build the sessions.
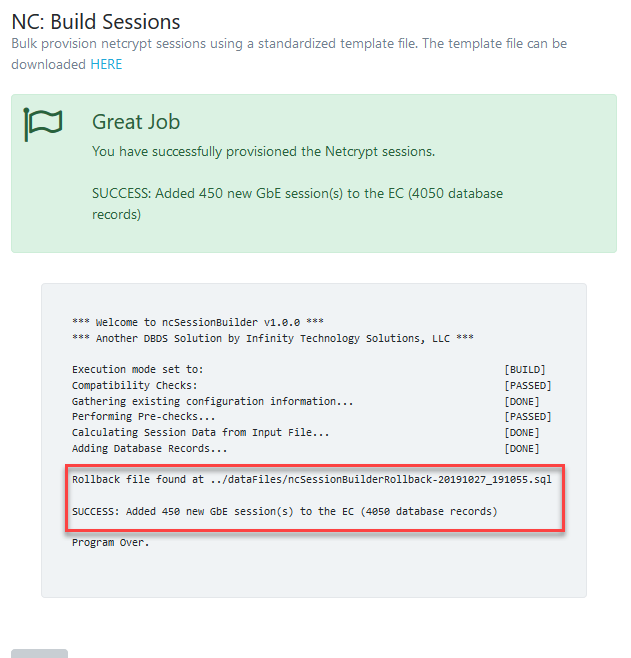
Review the Results
Confirm the sessions provisioned by evaluating the results.
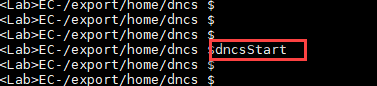
Restart the Explorer Controller processes by executing dncsStart as the dncs role/account.
System Verification
- Verify/monitor Explorer Controller health using standard best practices. It may take several minutes for the system to recover.
- Within the Explorer Controller application, find one of the new sessions and verify that the session status is Active.
- Telnet to a Netcrypt using the management IP of the device and execute print_session_status to confirm the new sessions are present on the device.
- Many commands exist within the Netcrypt to assist with troubleshooting. For a list of available commands, execute help all within the Netcrypt. These features go beyond the scope of this document. Please exercise caution.
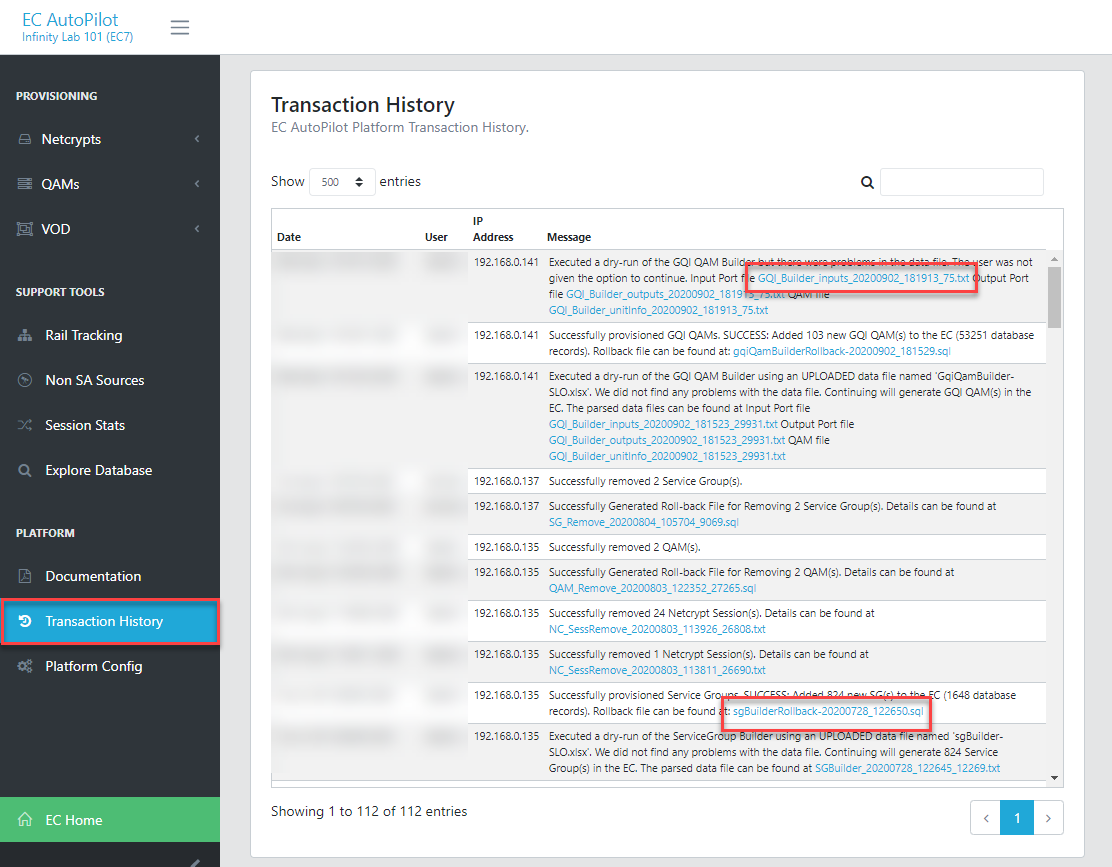
Review Logs
All transactions are automatically logged within the EC Autopilot framework. To review the Dry Run data or the rollback file, click the Transaction History on the left menu. Applicable files are available for immediate download by clicking on them in the table.
Roll Back
In the event a rollback is required, multiple options are available. Method 1 (preferred) leverages an SQL file which the ncSessionBuilder tool created during processing. Executing it deletes the database records directly from the database. Method 2 is to rollback from the database backup created prior to the maintenance window. Other options may exist, such as failing over to another Explorer Controller, but are beyond the scope of this document.
Rollback Method 1 - SQL
- Stop the Explorer Controller processes by executing print_session_status as the dncs role/account.
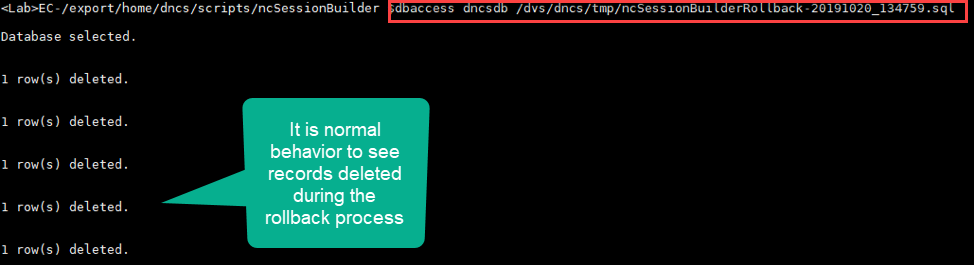
- Execute the dbaccess utility with the rollback file noted above dbaccess dncsdb ROLLBACK_FILE.SQL
Note: The rollback files can be found in /export/home/infinity/autopilot/dataFiles/ directory. Ensure you're using the correct rollback file, as multiple files may exist in the directory. - Start the Explorer Controller processes by executing dncsStart as the dncs role/account.
- Verify system stability.
Rollback Method 2 - Database Restore
Following documented and/or standard best-practices, perform a Database restore on the Explorer Controller.
GQI: QAM Builder User's Guide

Overview
The purpose of this document is to describe the process quickly provision Generic QAM Interface ("GQI") QAMs within an Explorer Controller using the GQI Builder utility bundled with the EC Autopilot framework. It's important to note that the GQI QAM Builder may also be executed via command-line, but doing so eliminates certain features such as history tracking. For more information about command-line usage, please visit the documentation section of the Software Portal.
System Requirements
- Explorer Controller 7.x
- A completed design package (spreadsheet)
- Modern Web Browser (Do not use legacy browsers with the EC Autopilot platform)
Maintenance Window Requirements
Provisioning GQI QAMs is a very fast process and will only take a couple minutes. Additional steps required to provision may take a little longer, such as stopping/starting processes, etc.
- The EC Autopilot allows you to upload and validate your template spreadsheet at any time (e.g. while processes are online)
- The EC Autopilot will not allow you to continue provisioning the GQI QAMs until the EC processes have been stopped (see below)
- Because the GQI QAM Builder automatically creates records directly within the database, it's highly recommended to disable all other database transactions during this process. This includes, but not limited to, database backups, cron-scheduled services/scripts, etc.
- Perform a database backup using standard documented procedures. Omitting this step will limit your rollback options.
Design Requirements
Prior to provisioning any GQI QAMs within the Explorer Controller, a design package must be created within the GQI Builder spreadsheet, which may be downloaded here.
Take note, there are three worksheets in the template that must be completed.
Unit Info Worksheet
This section contains the base design data for the GQI QAM and includes the following parameters.
- Headend Name: The headend the with which GQI QAM will be assigned. Under typical conditions an EC will only have a single Headend. However, it is possible that more than one can exist.
- Model Type: The GQI QAM model this QAM should be associated with. This value must be a valid, pre-existing GQI QAM model on the EC.
- QAM Name: The name to be assigned to the GQI QAM. Acceptable characters include all alphanumeric characters, hyphen(-) , underscore(_) and space only with a maximum length of 20 characters.
- IP Addr: The IP address of the GQI QAM management interface.
- MAC Addr: The MAC address of the GQI QAM management interface.
- Subnet Mask: The subnet mask of the GQI QAM management interface.
- Gateway: The gateway address for the GQI QAM management interface.
- Admin State: The administrative state of the GQI QAM. Acceptable values are Acceptable values are Offline or Online or USRM.
- PID Mapping: The PID mapping state of the GQI QAM. Acceptable values are Static or Dynamic.
- BFS: Indicates whether the GQI QAM will be allowed to carry BFS sessions. This is only allowed if the Model Type is defined as a Cisco GQI QAM Model. Acceptable values are Yes or No.
Input Ports Worksheet
This section contains the design data for the input port(s) of the GQI QAM and includes the following parameters.
- QAM Name: The name of the GQI QAM this port information is associated with. This value MUST match the QAM name used on the Unit Info Tab.
- Input Port: The input port being defined. This value MUST fall within the range of defined input ports as defined by the GQI QAM model associated with this GQI QAM.
- IP: The IP address of the GQI QAM streaming interface.
- MAC: The MAC address of the GQI QAM streaming interface.
- Subnet Mask: The subnet mask of the GQI QAM streaming interface.
- Gateway: The gateway address for the GQI QAM streaming interface.
- Bandwidth: The amount of bandwidth available for the GQI QAM streaming interface. Acceptable values fall within the range of 0 – 10000000.
- Enabled: Indicates whether the input port is enabled. Acceptable values are Y or N.
RF Ports Worksheet
This section contains the design data for the RF port(s) of the GQI QAM and includes the following parameters.
- QAM Name: The name of the GQI QAM this port information is associated with. This value MUST match the QAM name used on the Unit Info Tab.
- QAM Channel: The RF channel (aka port or frequency) being defined. This value MUST fall within the range of defined RF channels as defined by the GQI QAM model associated with this GQI QAM (e.g. 72). Alternatively, the PortNumber-CarrierNumber syntax is supported (e.g. 2-7)
- TSID: The TSID associated with this QAM channel.
- Modulation: The QAM modulation associated with the QAM channel. This value MUST match with QAM modulation values defined by the GQI QAM model associated with this GQI QAM.
- Freq: The STD center frequency associated with this QAM channel. Acceptable values can be entered as 555 or 555000 which would indicate a frequency of 555 MHz.
- CW Mode: Indicates whether the QAM channel is in CW mode. Y or N.
- Disabled: Indicates whether the QAM channel is disabled.Y or N.
- Interleaver Depth: Indicates the Interleaver depth associated with the QAM channel. All Interleaver depth values are supported, but the most common is i128j1.
- App Support: Indicated application support mode of the QAM channel. Acceptable values are Shared or VOD or SDV or Broadcast.
- Hub Assignments (Optional): Indicates the hubs that should be assigned to the QAM Channel. Acceptable values include pre-defined Hub IDs from the EC in a space delimited format.
WARNING: The EC allows GQI QAMs to contain TSID values that are duplicated across other GQI and Non-GQI QAMs. Precautions should be taken to ensure the design does not include TSIDs that are duplicates of values found on Non-GQI QAMs.
Dry Run
It's important to perform a Dry Run of your template file before making any changes. The Dry Run process verifies the design file (data errors, compatibility with database, etc) and it does not make any changes to the system. Follow the steps below to perform a dry-run with your spreadsheet.
There are two methods to execute a dry run: 1.) Select Local File, or 2.) Upload Spreadsheet.
The Local File method requires you to first upload your Excel Spreadsheet into the uploads directory using a separate mechanism (e.g. SCP, FTP, CyberArk, etc). Once uploaded, the EC Autopilot will evaluate the directory for valid Excel Spreadsheets to use. Please note, these files must not contain special characters or spaces and end with '.xlsx'. Also, it is recommended to remove these files from the uploads directory after the maintenance is complete.
The Upload Spreadsheet method allows you to upload a spreadsheet file directly from your local computer.
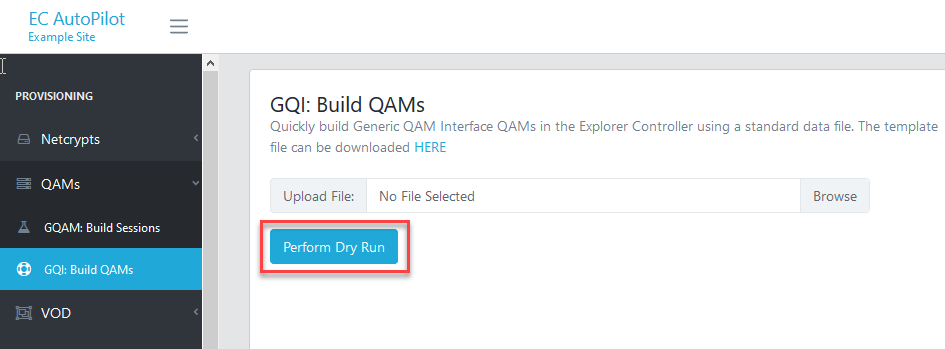
- Select the GQI: Build QAMs link from the EC Autopilot menu
- Using the File Upload form, choose your completed template
- Click the Perform Dry Run button
Review Dry Run Results
If the Dry Run is successful, the interface provides a Dry Run Successful message and indicates how many QAMs it would have built.
Example Successful Dry Run: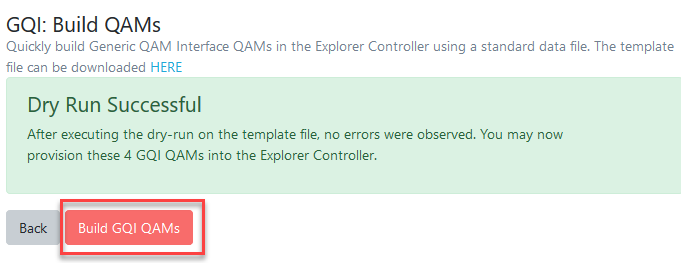
If the Dry Run failed, it provides a list of errors that it found with the design file. These conditions must be resolved prior to continuing.
Example Failure: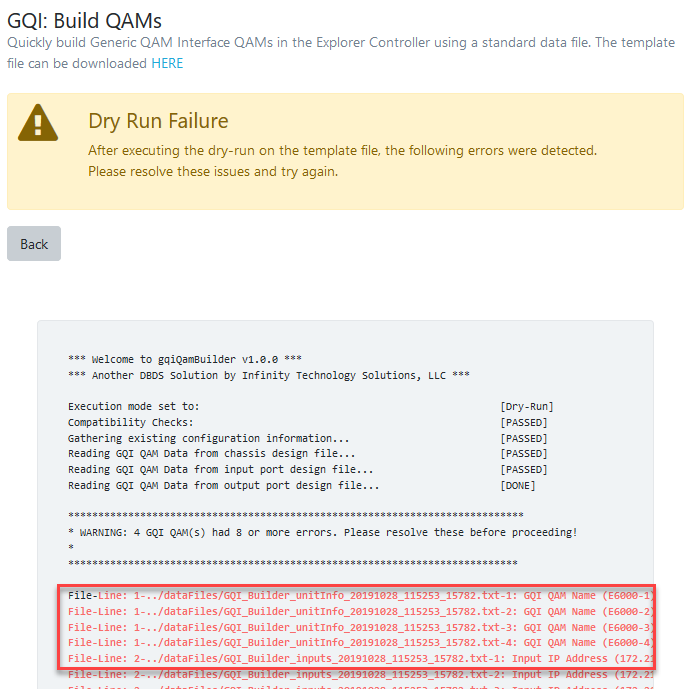
Build GQI QAMs
Since the GQI QAM Builder directly populates configuration data, it's important that the Explorer Controller processes are offline first. This minimizes database conflicts as well as forces the Explorer Controller processes re-read the configuration data upon process restart.
Once the Dry Run has successfully passed, the EC Autopilot automatically evaluates and monitors the process status of the Explorer Controller:

The processes will likely be online at this time. The EC Autopilot prevents you from continuing and displays following message:

Stop the Explorer Controller processes by executing dncsStop as the dncs role/account. Refer to any applicable internal operating practices for additional information.

Once the processes have stopped, the EC Autopilot will display an option to build the GQI QAMs. Click the Build QAMs button to immediately build the sessions.
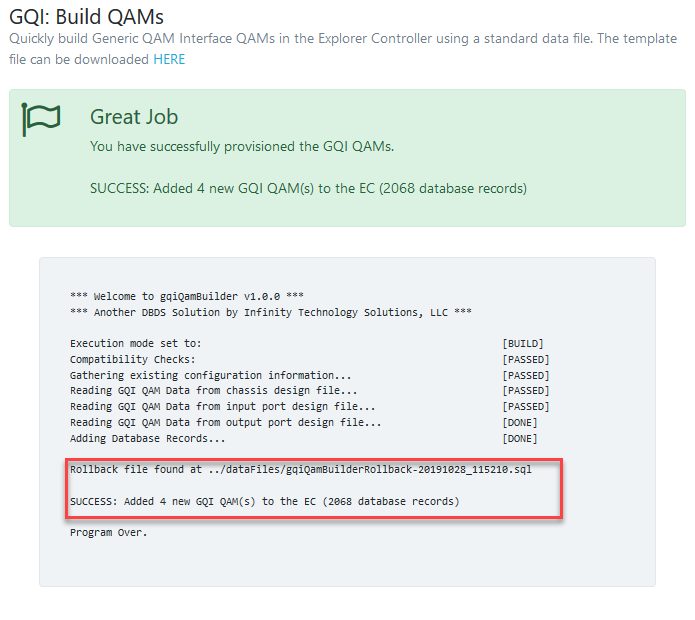
Review the Results
Restart the Explorer Controller processes by executing dncsStart as the dncs role/account.

Confirm the GQAMs successfully provisioned by evaluating the results.
System Verification
- Verify/monitor Explorer Controller health using standard best practices. It may take several minutes for the system to recover.
- Within the Explorer Controller application, find one of the new GQI QAMs and verify that the data was provisioned correctly.
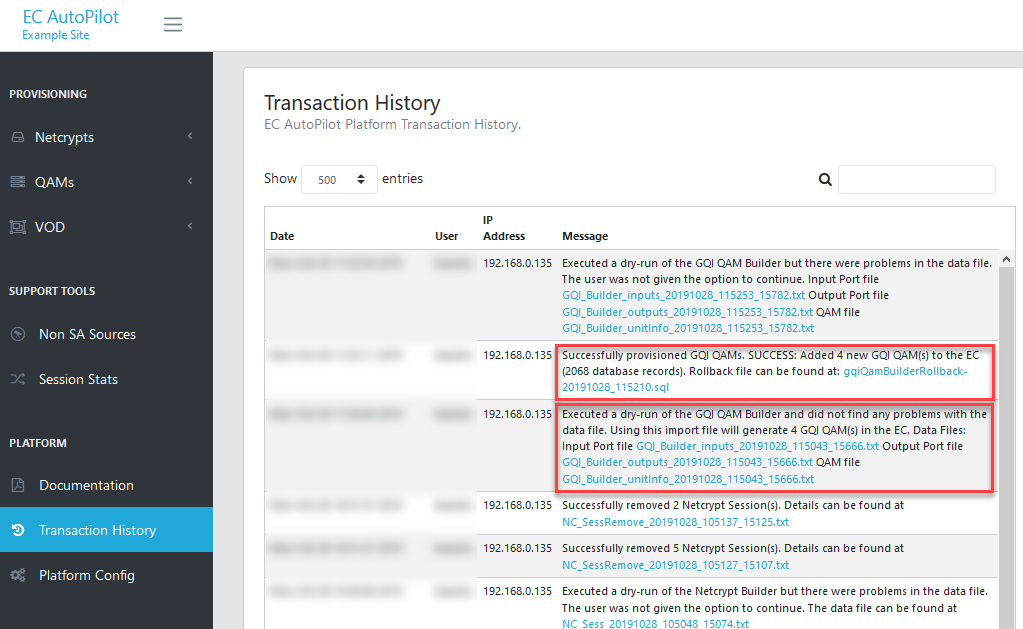
Review Logs
All transactions are automatically logged within the EC Autopilot framework. To review the Dry Run data or the rollback file, click the Transaction History on the left menu.
Applicable files are available for immediate download by clicking on them in the table.
Roll Back
In the event a rollback is required, multiple options are available. Method 1 (preferred) leverages an SQL file which the gqiBuilder tool created during processing. Executing it deletes the database records directly from the database. Method 2 is to rollback from the database backup created prior to the maintenance window. Other options may exist, such as failing over to another Explorer Controller, but are beyond the scope of this document.
Rollback Method 1 - SQL
- Stop the Explorer Controller processes by executing print_session_status as the dncs role/account.
- Execute the dbaccess utility with the rollback file noted above dbaccess dncsdb ROLLBACK_FILE.SQL

Note: The rollback files can be found in /export/home/infinity/autopilot/dataFiles/ directory. Ensure you're using the correct rollback file, as multiple files may exist in the directory. - Start the Explorer Controller processes by executing dncsStart as the dncs role/account.
- Verify system stability.
Rollback Method 2 - Database Restore
Following documented and/or standard best-practices, perform a Database restore on the Explorer Controller.
GQI: QAM Remover User's Guide
Overview
The purpose of this document is to describe the Remove QAMs tool.
Usage
The Remove QAMs tool allows for the user to remove legacy QAMs in bulk.
System Requirements
- Explorer Controller
- Identified QAM to remove
- Modern Web Browser (Do not use legacy browsers with the EC Autopilot platform)
Maintenance Window Requirements
- Removing QAMs requires the processes to be stopped on the Explorer Controller.
- Although this process only takes a few moments to complete, plan a Maintenance Window accordingly.
- Note: Configuration Elements are removed from the Explorer Controller. To recover configured elements, the user must refer to the Transaction History panel.
Remove QAMs
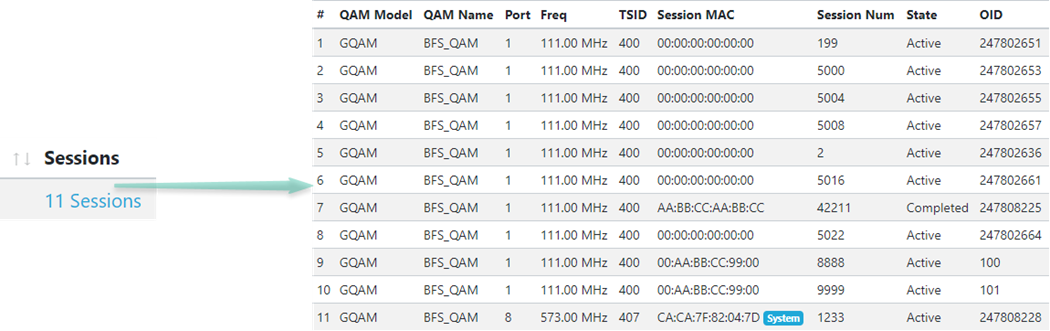
All Legacy QAMs are listed within the table. Legacy QAMs include Scientific Atlanta and Cisco models; CA QAMs (UniQAMs), MQAMs, and GQAMs. If the QAM has an online session, service group, or TSR it will not be available for removal.

If any do exist, a link is provided to view them within EC-Autopilot.
Page Results
Each column provides the ability to be sorted by clicking the ascending or descending arrows.

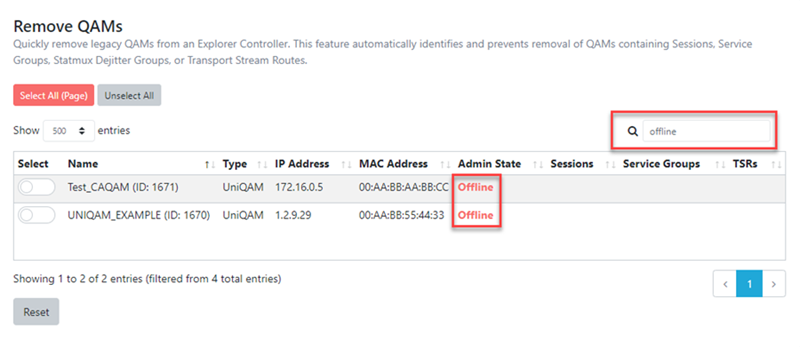
The user can further the search by typing a text string into the search bar.
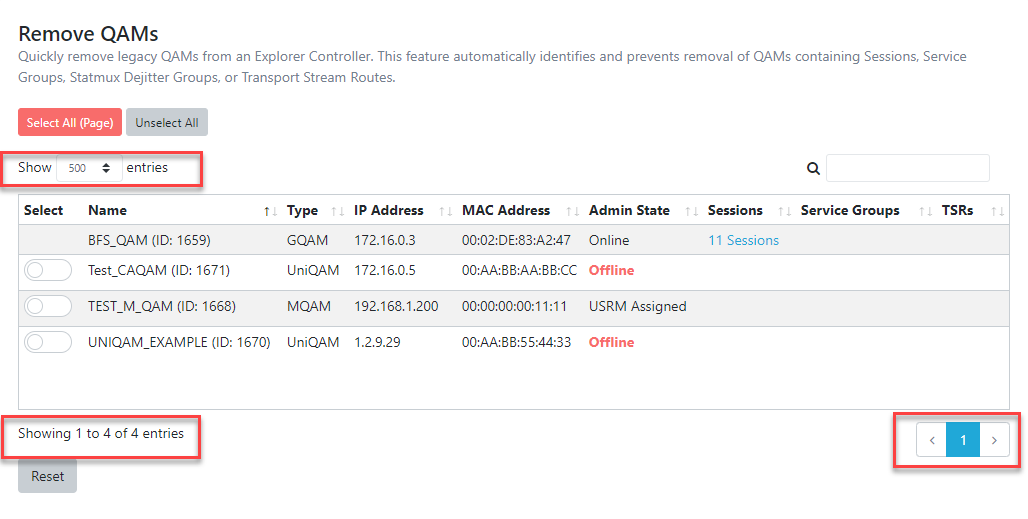
The user can adjust the number of entries per page by changing the Entries field. Note, pagination at the bottom is automatically updated based on the record quantity.
Remove QAM
WARNING: All configured Elements are removed from the Explorer Controller.
- Navigate to Remove QAMs under the QAMS Provisioning Group.
- Choose the appropriate Legacy QAM to be removed.

- Since this module performs bulk database operations, the Explorer Controller processes must be offline. The EC Autopilot automatically evaluates and monitors the process status of the Explorer Controller:

The processes will likely be online at this time. The EC Autopilot prevents you from continuing and displays following message:

-
Stop the Explorer Controller processes by executing dncsStop as the dncs role/account. Refer to any applicable internal operating practices for additional information.
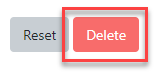
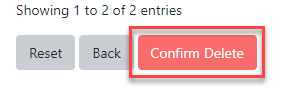
- The user will be prompted to "Confirm" prior to proceeding.
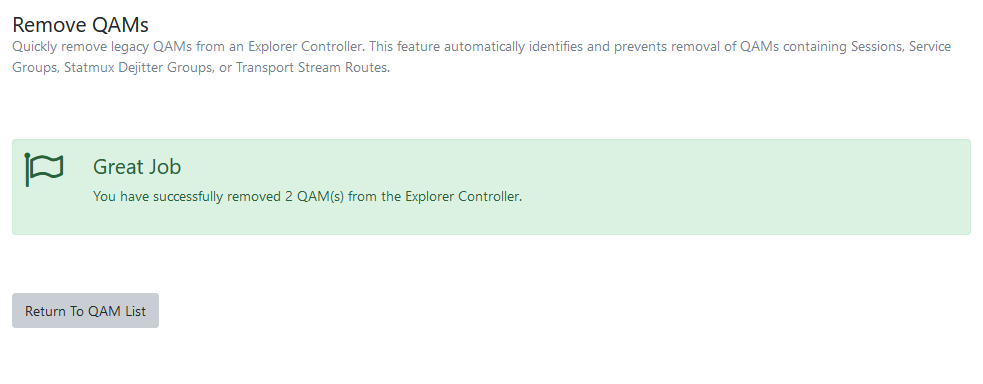
- The module will automatically remove the components and provide a summary once complete.

Review Logs
All transactions are automatically logged within the EC Autopilot framework. To rollback to the file, click the Transaction History on the left menu. Applicable files are available for immediate download by clicking on them in the table.

Explore Database User's Guide
Overview
The purpose of this document is to describe the Explore Database Library.
Usage
The Explore Database Library allows a user to conveniently view and search raw database records within the Informix Database without adding risk of manually executing database commands.
Explore Database
Upon accessing the Explorer Database feature, the user will be presented with a list of tables found within the dncsdb database.
Certain tables, often those containing security-related data, may not be available via this module. They can be identified by their color: Disabled_Table
Next to each table is the estimated number of records within it and empty tables automatically appear at the bottom of the list. Note, when large changes to a table occur, the user may need to invoke the updateStatistics.sh utility to update the record count details.
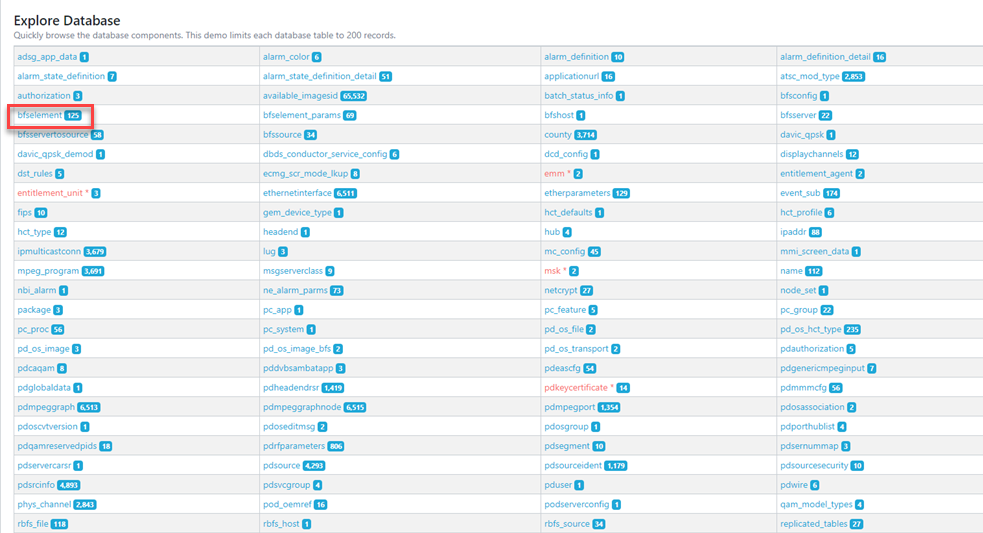
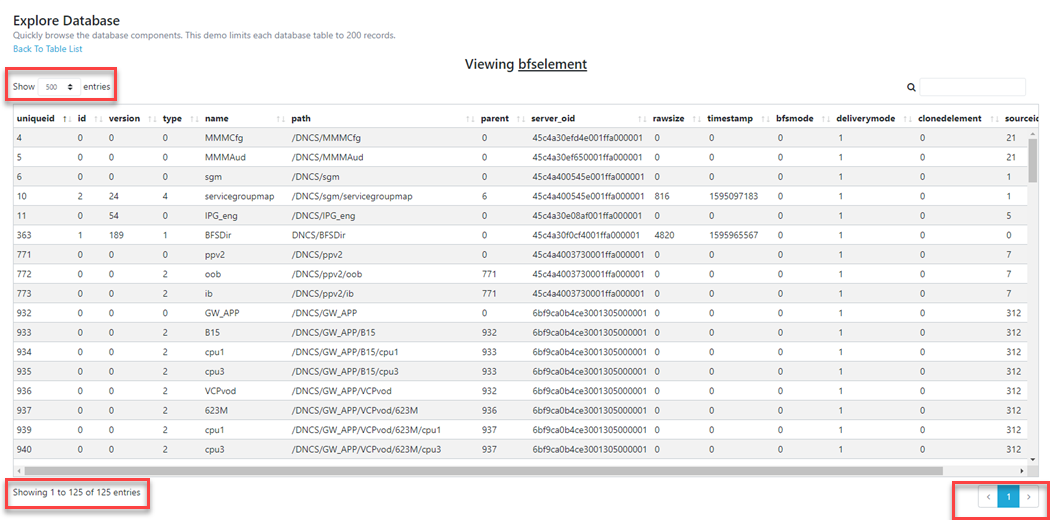
Selecting a table allows the user to view the contents of it.
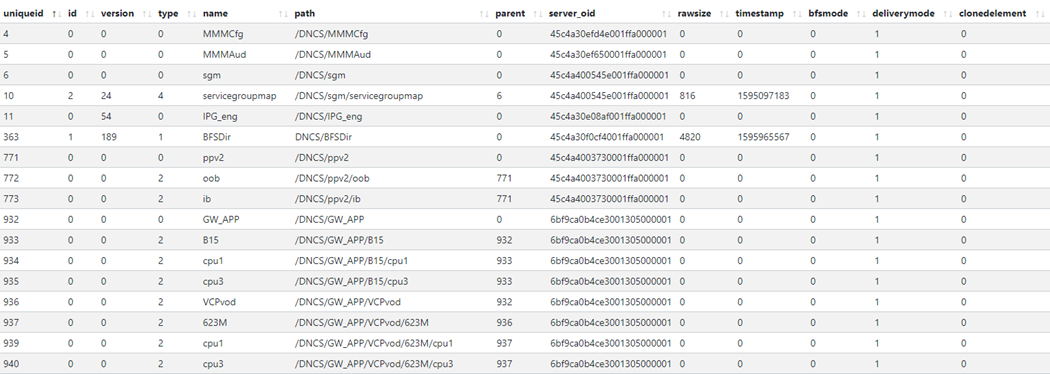
Page Results
Each column provides the ability to be sorted by clicking the ascending or descending arrows.

The user can further the search by typing a text string into the search bar.
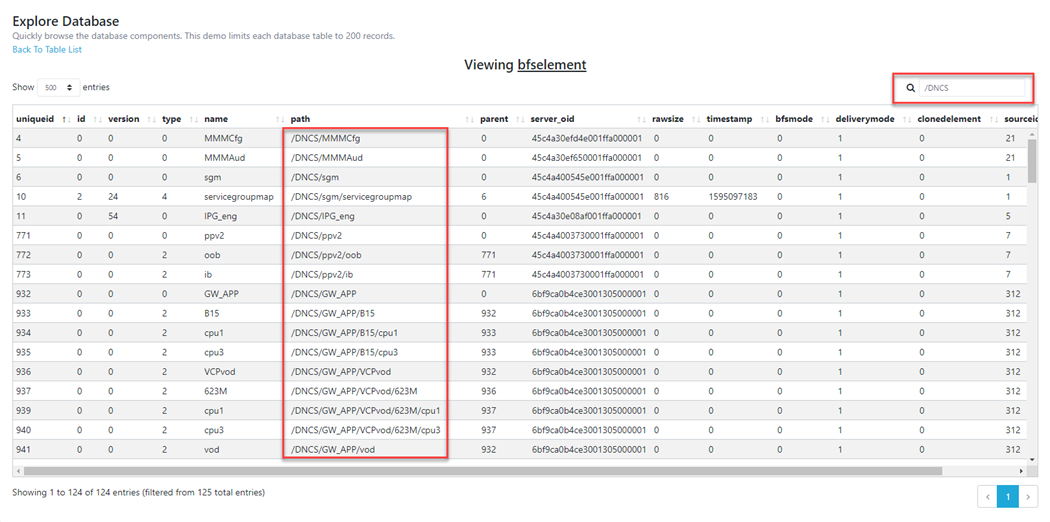
The user can adjust the number of entries per page by changing the Entries field. Note, pagination at the bottom is automatically updated based on the record quantity.